Thursday, September 6, 2012

Granola the healthy way

After making the dehydrated strawberries and blueberries I decided that I needed make something else to use them up. Hence the granola. I like my granola like I like my salads, a little less granola and a lot of the extras, dried fruit, coconut, seeds and don't forget the chocolate chips. When I am done with my granola it doesn't really look like anything healthy.

I took a recipe from Robin Mather's book The Feast Nearby. Her recipe called for 10 cups rolled oats, 1/2 cup each of two kinds of nuts (I used almonds and walnuts), 1/2 cup each of two kinds of seeds (I used sunflower and pumpkin), 1/4 cup sweetener (like honey, agave nectar or real maple syrup), 1/4 cup coconut, dried fruit and vanilla, orange, strawberry, coconut or any other kind of extract. I kinda did all this stuff to taste and I added semi-sweet chocolate chips because I am crazy like that.
Here are the ingredients minus the honey I borrowed from my dear neighbor Mike
The first step is to heat up the oven to 350 degrees, I know. It's stinking hot outside what the heck is with heating up the oven? Don't worry, it is only for about 10 minutes. So you heat up the oven and you pour the oats into a roasting pan. I had to use two because you are supposed to keep it less than two inches thick and 10 cups is a lot of oats.
That's a whole lotta oats. 
You roast up the oats for about 10 minutes, stirring every once in a while until they look like this:
Nice and toasty
I also added the nuts and seeds to another baking dish and toasted them. They toasted faster than the oats.
Once the nuts were done I chopped them all up. You can also use a food processor but I couldn't find all the pieces for it so I worked it up old school.
Then you dump everything in a bowl and mix it all up and there you have it, granola.
This was pre-chocolate chips. Those little dark guys are my dried blueberries.
So, you know how the granola you buy at the store is so yummy and delicious? Turns out that's because of all the oil and sugar. It completely de-healthifies it. You really gotta get used to this healthier version. I like it but the unhealthy version tastes better. Of course. I will keep messing with this, maybe I just need to tweak it.


Sunday, September 2, 2012

Deydrating Mania Part Deux

After discovering how easy it is to dehydrate stuff I decided to try my hand at blueberries! They were even easier.
You take a whole mess of blueberries and wash them really well. Pick out the smushed and squishy ones and then you squeeze some lemon juice on them.


Aren't these colors pretty?
Then you spread them out on the trays like so:
And then you turn on the dehydrator and wait. And wait, and wait and waaaaiiiiit for about 16 hours. Blueberries take a long time and when they are done they look like this!


Lovely
One thing I noticed was that some of the berries were really dried up like super chewy raisins while others were still kinda squishy. I just decided to stop drying when there were a few chewy ones but mostly they looked a little juicy. After everything cooled down they all tasted pretty much the same. They were pretty good while they were warm. Weird huh?

I also noticed that the whole house didn't smell like blueberries. I guess the strawberries are just more fragrant.

I have been popping handfuls of these bad boys for the past few days. Yumm!


Tuesday, August 28, 2012

Dehydrating Mania

I have always liked dried fruits but the stuff I like (blueberries, strawberries and cherries) are kind of expensive and they usually have chemicals and sugar added to them.

I started doing a little research and it turns out that dehydrating is really easy so I picked up a food dehydrator and started experimenting. 

There are lots of food dehydrators out there so don't get overwhelmed. The things you want to look for are units that have varying temperatures and units with the fan on the top. A timer would be super helpful but I think those are a bit pricier and it isn't a necessity. This little guy was $64.00 but I had a 20% off coupon from Bed, Bath and Beyond SCORE!
Brand new dehydrator and some strawberries and we are ready to go! 

Dehydrating food is super complicated. Ha ha, just kidding. It is really easy. Almost too easy, you think you are for sure doing something wrong because it is way too easy.

You start out with a whole mess of strawberries and then you pull out all the stems. This handy little gizmo made quick work of this task.
Trying to get a little artsy with the photography and this is what you get
Once the strawberries have all their little green tops removed you must rinse them thoroughly and then you slice them all up.
They look so deleeeeshious  
I read different articles about the required thickness of the slices from 1/4 inch to 1/2 an inch to just slice them in half. I went with about 1/2 and inch because I was hoping for some chewy dried strawberries. Once I sliced them all up I placed them on the dehydrating trays.

I turned the dehydrator on to 160 degrees for the first two hours and then dialed it back to 135 degrees for the rest of the time. So... when we are talking about time, we are talking about a looooong time. Strawberries can take anywhere from 10-14 hours. It is best to start this project first thing in the morning or in the evening. You don't want to have to be getting up at midnight to go check on your strawberries to see how they are doing.


These strawberries took about 11 hours. It maybe been a little bit faster if I hadn't been lifting the lid on the dehydrator every hour or so to see how things were coming. I couldn't help it, the whole house smelled like strawberries, it was intoxicating.
This is about 5 hours in. I forgot to take a finished product picture.
As the strawberries dry out you will realize that slicing them uniformly is pretty key. Some of them are pliable and others are crunchy little strawberry crisps. The crunchy ones taste ok but the chewy ones are what we are going for. 

When I felt like they reached a good consistency (pliable not crunchy) I shut off the dehydrator and let everything cool down then I put them in a quart size jar with a screw top lid and have been munching on them ever since.  Look out blueberries! You are next!
Can you believe this is all you get from all those strawberries?


Saturday, August 25, 2012

Vanilla Sugar

I am reading this great book called The Feast Nearby by author Robin Mather. It is all about how she learned to eat delicious, locally grown and raised food on $40 a week. She accomplishes a lot of this by by eating what is in season (because it tastes better and is less expensive) and by preserving, drying and freezing to enjoy them later.

She has a delicious sounding recipe for french style strawberry preserves. I want to try it but one of the ingredients is vanilla sugar. She said to take one pound of sugar, crack two-three vanilla beans and place them in the sugar and seal it up for a week. Oh the waiting, you know I am not great with the waiting.


Stay tuned for the super messy sounding adventure in french style strawberry preserves.

Tuesday, August 21, 2012

Adventures in canning

My first foray in to canning was with my dear friend Suzanne and her mom. Her mom is a home making guru and has canned many, many things. She helped Suz and I "put up" (a little canning speak heh heh) about 24 jars of blackberry jam. Uh, we have two jars left. It was really good.

Suz instagrammed it up
So for my next trick I enlisted the help of my guru, Mike. Mostly I wanted him to chop the peppers and the garlic for the hot pepper jelly. Recipe here.

Here he is chopping away! I chopped the more benign red and green bell peppers.

Once all the chopping action was finished, I placed the jars in a large pot with a a little bit of water and let them get really hot, just a little less than boiling.

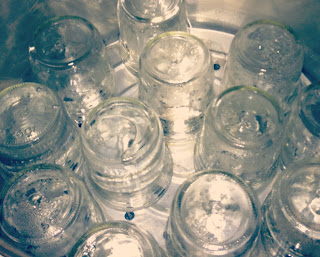
Mike had a little tray for them so the water could circulate
After we got the jars going, we put the little flats for the lids in another pan with some water and turned that on medium. Just a little less than boiling. Then it was time for the jelly making!

We tossed in a cup of very nicely diced jalepeno peppers, and some awesomely diced red and green bell pepper,  garlic, SIX cups of sugar (oh my) and apple cider vinegar. The recipe called for white vinegar but all we had was the apple cider vinegar. It worked just fine. 

As soon as we got everything boiling pretty well we hit the timer for ten minutes. It was ten loooong minutes of me asking Mike if it has been ten minutes yet and if he was sure he set his watch right because it felt like ten minutes.

and stirring and stirring....
With stirring finished, we added in the pectin. The recipe said two packs but I was hesitant because I wanted it to be more sauce-y and not as much jell-y. We dumped in the first pack and then threw caution to the wind and dumped in the second one. We waiting the prescribed one minute and then began to fill our jars.

I got this handy dandy little utensil set at wal-mart. They have all kinds of canning stuff so when I left there I had many more ideas of things I wanted to try. I am getting brave y'all. Anyway, this little set was $7.00 and it was totally worth it. We didn't use the little spatula thing but all the other stuff was super helpful and I felt like a real professional canner.


This hot pepper jelly is spicy and sweet and really delicious on lots of stuff. You can spread it on a sandwich, on crackers with cream cheese, put a dollop on grilled fish or maybe even eat it straight out of the jar with a spoon. I think when we make it again we will do maybe one and a half packs of pectin. I think that would be the best texture.

Finished product!
 Ok, so that was my little foray in to canning. I have a few more ideas for things to try. I want to do pickles and I saw this recipe for pumpkin butter and we kind of need more jam. I will post some more adventures in canning as I experiment.